I’m so exciting to write this post because we missed some important updates that blogger team made to blogger platform, and i can’t just keep posting tutorials without posting some thing about this amazing blogger updates and news, are exciting too, so let’s see what is the most important blogger updates through the last few weeks.
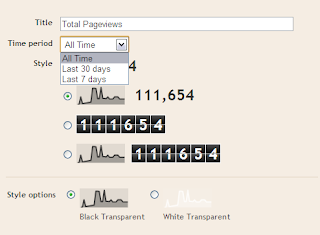 This new stats gadgets allows you to show of your blog page views with out using any external scripts, just go to your dashboard >> design >> page elements, and click add new gadget, then choose the Blog’s Stats gadget,
this gadget have some great features, you can choose the page views to be displayed as a numbers, or in a bars, and you can choose the both. you can change it’s color, to suit your dark or light colors blogger template.
 As a professional or beginner blogger, you must know that your blog feeds are important to your blog readers, and in the past, you didn’t have the full control on your blog feeds, so blogger now added a nice feature allows you to take some control over your blog feeds.
By going to your blogger dashboard, navigate to your settings page, and click on Site Feed tab, Now you will see a drop down menu, this drop down have 3 options,
 After google released web fonts free service and millions around the world loved it and used it,
google made a great step by launching web fonts to all blogger users.
You can try it your self by going to the blogger template designers through your account, and then choose the text that you want to change ( post title, blog title, …. ) and click on your favorite font to see it’s preview, if you liked it, then click apply to blog.
 Android OS used now by millions, if you are a blogger user and have a gadget that running on Android OS, so you should get this amazing app,
it’s the official Blogger Android App. lets see what is this app can do for you,
 Blogger added new 9 languages to a collection now totaling 40 languages, the new languages are ” Amharic, Arabic, Bengali, Greek, Persian, Gujarati, Kannada, Hindi, Malayalam, Marathi, Nepali, Punjabi, Russian, Sanskrit, Serbian, Tamil, Telugu, Tigrinya, and Urdu “
You can enable your preferred language by going to Settings >> Basics tab, and select Enable, then choose your language.
Please note that : The new language options are only available on the new post editor
Dear readers, this was the most important recent blogger updates, i wish you will benefit from it all.
1. Blog’s Stats Gadgets.
this gadget have some great features, you can choose the page views to be displayed as a numbers, or in a bars, and you can choose the both. you can change it’s color, to suit your dark or light colors blogger template.
2. Blog Feeds Control.
By going to your blogger dashboard, navigate to your settings page, and click on Site Feed tab, Now you will see a drop down menu, this drop down have 3 options,
- Short : Will show only the first 400 characters of your posts in your feeds, and will ignore the html, and all images on your post
- Full : Will forward all your post to your feeds and will show all element including html, and all images Now what if you want to show your readers a short part of your post with only one image and not all Images? That’s way blogger team added the next option.
- Until Jump Break : This will allow your feeds to take only the part that is before the jump break only, and by this way, you can control every single post with it’s own rule.
3. Web Fonts To Templates Designer.
google made a great step by launching web fonts to all blogger users.
You can try it your self by going to the blogger template designers through your account, and then choose the text that you want to change ( post title, blog title, …. ) and click on your favorite font to see it’s preview, if you liked it, then click apply to blog.
4. Official Blogger Android App.
it’s the official Blogger Android App. lets see what is this app can do for you,
- Multiple accounts and blogs : You can easily switch through your blogs and account.
- Write and save/publish : From your gadget, you can write a post, and add some labels, you may save, or publish it.
- Photos from camera and gallery : You can add photos directly using your gadget camera, or from your gallery.
- Sharing to Blogger from gallery or browser.
- Share location : You can share your location by activating the location bar
- And some extra amazing features…
5. More Supported Languages.
You can enable your preferred language by going to Settings >> Basics tab, and select Enable, then choose your language.
Please note that : The new language options are only available on the new post editor
Dear readers, this was the most important recent blogger updates, i wish you will benefit from it all.



 Below Menus are from the Above image and menu numbers are 1 to 17 respectively.


