Showing posts with label Best Blogger hacks. Show all posts

Saturday, June 18, 2011

Why Not Getting A Custom Domain For Your Blogger Blog Is Stupid

In this post we want to look at custom domains and using a custom domain on Blogger instead of the blogspot sub domain.When you start your free blog on Blogger you choose a free sub domain like spiceyourblog.blogspot.com.This is the address of your blog and in general you carry on setting up your blog and start posting.However you do have the option to use a custom domain and get rid of the blogspot part, to be like spiceupyourblog.com, a full domain without blogspot.What are the advantages of this ? In fact the advantages are huge !

Blogger is totally free and that is a big attraction over other platforms like Wordpress, while there is a free version of Wordpress it is rubbish and constraining.The self hosted Wordpress is a fantastic platform but you must have a custom domain and pay for hosting every month.So if you want to set up a blog quickly with a lot of freedom most will go with Blogger.Blogger do not charge for hosting or indeed anything connected to your blog, 99.9% of Blogger templates are free as are any gadgets etc you require (And you have amazing blogs like this with Blogger Tips helping you along the way :D ).


Dot Blogspot Dot Com


But Blogger or more specifically blogs using Blogspot sub domains have been in some quarters for this very reason associated with low quality sites.In fact many people land on a blog, see it has a blogspot sub domain and are immediately sceptical.Why ? Here's what i think ..

The great feature of being able to start a blog on Blogger in less than 5 minutes also has it's downside.Tens of Thousands of blogs started are by people that write 3 or 4 posts and realize it's not as easy as it looks so quit.Leaving low quality outdated blogs behind them.

Spammers using the free service to set up auto blogs and republish copied content surrounded by ads.Some of the blogs i have seen are a joke with more ads than content.

While there are lots of amazing blogs using blogspot sub domains there are now hundreds of thousands of abandoned or low quality blogs also.And these blogs in many ways hurt the general image of Blogger Blogs using blogspot sub domains.

In the same way as i when i see a blog with the domain .co.cc or .tk (both free) i instantly think the site will be low quality, if they were serious about the site they would have a full domain often a blogspot sub domain is looked at in the same way.

Custom Domains Are Almost Free


That is why in my opinion not having a custom domain is just stupid ! If the custom domain cost $100 i would think OK well that is a lot of money for most people.But it's nothing near that.Setting up a custom domain directly though Blogger is easy and costs just $10 per year.

That's $0.83 cent per month or less than $0.3 cent per day !

Every thing else is free, surly you can afford $10 bucks in a year.And by setting it up through Blogger it is all done for you and you have features like free Email accounts connected to your domain (yourname@yourblog.com).In fact just this week your Google Apps account connected to your domain can act as a full Google account, more on that at a later date.

In a Recent post on ProBlogger the question was asked "Why are Bloggers so against spending money on their blogs?" That post was about buying advertising and spending a few hundred bucks.But it is a valid question, why are Bloggers so against spending even a few dollars when it can have such a huge impact ? We really do need to get out of the "Everything Should Be Free" Mentality.

Setting Up Your Domain


In the next post that i will publish (Later Today) to run along side this i will show you in a video just how simple it is to buy and set up your free domain through Blogger.Update - That video post is published and can be found here - Buy A Custom Domain Directly From Blogger And Connect It To Your Blog.

And remember even though a domain can be bought for around a dollar cheaper elsewhere always use Blogger, and people telling you otherwise are probably doing it so you use there referral link for domain registrars.The last thing a newbie wants to be doing is trying to figure out the DNS settings on a site like GoDaddy.

Why You Wouldn't Change To A Custom Domain


I guess there are a few cases in which i wouldn't change.The main one would be if you have a really well established blog.Lets say you have been blogging for a few years and have already built a brand around the Blogspot domain.But even if your blog is lets say a year old with 100 posts i would still make the change.

Drop Your Comments And Questions Below.


Create Email Addresses Connected To Your Blogger Custom Domain Plus Access DNS Settings And More

This week we looked at using custom domains on Blogger Blogs, why you should get a custom domain and the steps to buy and connect a custom domain on Blogger.Those posts have been popular and I'm delighted to see many of you have took my advice and bought domains for your blog getting rid of the ugly blogspot.In those posts i mentioned Google Apps and how when you buy a domain through Blogger you get a free Google apps account.Google apps actually offer some great features that are all available to you once you buy your domain.Two of the main features of Google apps are the option to create Email addresses associated with the domain you bought.So you can create for example yourname @yourblog.com or info @yourblog.com and so on.Another feature of Google apps is the option to access your DNS or Domain Settings.So you can log into your domain host account and access things like Cname records.

In this video post i do my best to explain the whole process from accessing your Google apps account to creating multiple Emails connected to your domain, enjoy !

That's it for this Blogger Tip, have to admit it was hard to explain so the video went a bit long (As did the title of the post :p).Luckily YouTube did take the full video so hopefully you have learned just some of the Google Apps features available to you.

Remember Google apps offer many many more features and we only touched on the basics, you should take 30 minutes when you get the chance to look through all it offers.The Google Apps Support center is a great place to start.

Drop Your Comments And Questions Below. 



Latest Most Important 5 Blogger Updates

I’m so exciting to write this post because we missed some important updates that blogger team made to blogger platform, and i can’t just keep posting tutorials without posting some thing about this amazing blogger updates and news, are exciting too, so let’s see what is the most important blogger updates through the last few weeks.
1. Blog’s Stats Gadgets.
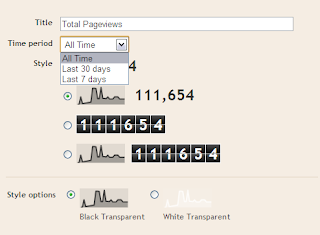
Blogger Stats Gadgets
This new stats gadgets allows you to show of your blog page views with out using any external scripts, just go to your dashboard >> design >> page elements, and click add new gadget, then choose the Blog’s Stats gadget,
this gadget have some great features, you can choose the page views to be displayed as a numbers, or in a bars, and you can choose the both. you can change it’s color, to suit your dark or light colors blogger template.
2. Blog Feeds Control.
Blogger Blog Feeds Control
As a professional or beginner blogger, you must know that your blog feeds are important to your blog readers, and in the past, you didn’t have the full control on your blog feeds, so blogger now added a nice feature allows you to take some control over your blog feeds.
By going to your blogger dashboard, navigate to your settings page, and click on Site Feed tab, Now you will see a drop down menu, this drop down have 3 options,
  • Short : Will show only the first 400 characters of your posts in your feeds, and will ignore the html, and all images on your post
  • Full : Will forward all your post to your feeds and will show all element including html, and all images
  • Now what if you want to show your readers a short part of your post with only one image and not all Images? That’s way blogger team added the next option.
  • Until Jump Break : This will allow your feeds to take only the part that is before the jump break only, and by this way, you can control every single post with it’s own rule.
3. Web Fonts To Templates Designer.
Blogger Web Fonts to templates designer
After google released web fonts free service and millions around the world loved it and used it,
google made a great step by launching web fonts to all blogger users.
You can try it your self by going to the blogger template designers through your account, and then choose the text that you want to change ( post title, blog title, …. ) and click on your favorite font to see it’s preview, if you liked it, then click apply to blog.
4. Official Blogger Android App.
Official Blogger Android App
Android OS used now by millions, if you are a blogger user and have a gadget that running on Android OS, so you should get this amazing app,
it’s the official Blogger Android App. lets see what is this app can do for you,
  • Multiple accounts and blogs : You can easily switch through your blogs and account.
  • Write and save/publish : From your gadget, you can write a post, and add some labels, you may save, or publish it.
  • Photos from camera and gallery : You can add photos directly using your gadget camera, or from your gallery.
  • Sharing to Blogger from gallery or browser.
  • Share location : You can share your location by activating the location bar
  • And some extra amazing features…
5. More Supported Languages.
More Supported Languages
Blogger added new 9 languages to a collection now totaling 40 languages, the new languages are ” Amharic, Arabic, Bengali, Greek, Persian, Gujarati, Kannada, Hindi, Malayalam, Marathi, Nepali, Punjabi, Russian, Sanskrit, Serbian, Tamil, Telugu, Tigrinya, and Urdu “
You can enable your preferred language by going to Settings >> Basics tab, and select Enable, then choose your language.
Please note that : The new language options are only available on the new post editor
Dear readers, this was the most important recent blogger updates, i wish you will benefit from it all.


Thursday, May 26, 2011

PayPal Donation Button Widget - Make Money-How to add Paypal Donation widget to Blogger?


Here is a great way for your readers to reward you for all the hard work and effort you've put into your blog. A PayPal Donation button will allow your readers to easily send you money via PayPal.

PayPal Icons

These icons can be used as your donation button if you choose to customize.


Adding a Paypal Donation Button


Sign into your Paypal account and if you don’t have one you can get a free paypal account here.
  1. Login into your Paypal account with your paypal E-mail address and password:
  2. Click on ‘Merchant Services’ Tab available in the Top Menu
  3. When you scroll down your window, you will see a ‘Donations’ link in the ‘PayPal Website Payments Standard’ heading Section.
  4. Clicking on the ‘Donate’ link will take you a form where you are asked to fill some information’s like Organization name/service, Donation ID (optional).
  5. Click on 'Customize Appearance' in order to use your own image for the button. You may use one of the images above if you like.
  6. After Filing the required information click on ‘Create Button’ link.
  7. Now you will see some HTML Code, copy it

Adding HTML code into Blogger blog:
  1. Sign in into your Blogger Blog and Click on the ‘Layout’ link in your dashboard
  2. Click ‘Add a Gadget’ link and select ‘HTML/JavaScript’ option
  3. Now paste the HTML code that you copied from your Paypal account and save it.
  4. Now open your blog and you will see the ‘Paypal Donate’ button in your blogspot blog sidebar. You can display Donate button wherever you want on your blog like blog Header, footer or its sidebar

Adding HTML code into Wordpress blog:
  1. Login into your Wordpress blog and go to its Dashboard
  2. Click Presentation –> Widgets
  3. Click on the content area in front of ‘Text 1’ widget
  4. Paste your HTML code in the content area available and save changes
  5. Open your Wordpress blog and check donate button will be in your blog sidebar


Get 700+ Backlinks For Free / Free Backlinks Generator


Instructions

1: Please Turn Off Your Popup Blocker
2: Enter your website address in the box above with (No http:// or www. )
3: A list of websites will then be displayed below and each one will popup in a new window.

Free Backlinks Generator


More info : http://backlinkin.com


How To Add Author Bio Box to Your Blogger Below Every Blogger Post


1.Login to your blogger dashboard--> Desing- -> Edit HTML

2.Scroll down to where you see ]]></b:skin> tag .

3.Copy below code and paste it just After ]]></b:skin> tag


<style type='text/css'>                                 
#Bttoolz Author Box {
background: none repeat scroll 0 0 #EDEDED;
padding: 10px;
margin-top:10px;}
.authoravatar {float:left;margin-right:10px;padding:4px;background:#ccc;border:1px solid #222222;}
.postauthor {float:left;}
</style>

4.Now Scroll down to where you see <data:post.body/> tag.

5.Copy below code and paste it just After <data:post.body/> tag.


<div style='clear:both'/>                          

<div id='Bttoolz Author Box'>

<!-- Author Bio-->

<b:if cond='data:blog.pageType == "item"'>

<b:if cond='data:post.author == "NAME OF AUTHOR"'>

<img class='authoravatar' height='39' src='IMAGE URL OF AUTHOR' width='39'/>

<div class='postauthor'>

<h3><a href='AUTHOR'URL Here'>NAME OF AUTHOR </a></h3>

<p> NOTES ABOUT Your Self </p>

</div>

<div style='clear:both'/>

</b:if>


Note : Replace NAME OF AUTHOR , IMAGE URL OF AUTHOR , AUTHOR'URL Here ,NAME OF AUTHOR , NOTES ABOUT Your Self with your content..

6. Now Save Template And You are done..

Cheers..!


Coming Soon Under Construction Blogger Template


Template Name : Coming Soon Under Construction Blogger Template

Template Author : Avinas Bhardwaj / besttheme.net

Designer : medialoot.com

Basic Instructions : How to install a Blogger template

Descriptions : Coming Soon Under Construction | Blogger Template is another beautiful Under Construction blogger template which is modified and converted from WordPress template.

Coming Soon Under Construction | Blogger Template is a HTML5 / CSS3 simple under construction blogger template.Easy to use, easy to manage, as simple as a click.


How To Add Blue Html Color Scroll Box to Your Blogger

How To Add Blue Html Color Scroll Box to Your Blogger

1.Login to your Bogger Dashboard and go to Desing >> & Page Elements.

2.Click on 'Add a Gadget' on the sidebar.

3.Select 'HTML/Javascript' and add the one of code given below


<div style="height:90px;width:600px;overflow:scroll;background-color:#0080FF;">Hello This is Html Color Scroll Box </div>
<p style="font-family:verdana,arial,sans-serif;font-size:10px;"></p>

Note: Replace Hello This is Html Color Scroll Box with your text or anything.

4. Now Click on Save "Html Java Script" and You are done..

Cheers


How To Add Reflection Effect to Your Blogger Images


1.Login to your blogger dashboard--> Desing- -> Edit HTML

2.Scroll down to where you see ]]></b:skin> tag .

3.Copy below code and paste it just After ]]></b:skin> tag


<script src='http://bloggertrickandtoolz.googlecode.com/files/reflection.js' type='text/javascript'/>

4.Click on Save Template

Note: Now Add below code Your Blogger Post and Replace your image URL.

<img src="Your Image URL HERE" class="reflect"/>

Now Refresh your blog and you are done..

Cheers..!


How To Add Blogger Cool Popular Posts Widget With Zoom Effect V3 / Using CSS


1.Login to your blogger dashboard--> Desing- -> Edit HTML

2.Scroll down to where you see ]]></b:skin> tag .

3.Copy below code and paste it just After ]]></b:skin> tag


<style type='text/css'>
.PopularPosts .item-title{display:none}
.PopularPosts ul li {background: none repeat scroll 0 0 transparent;float: left;list-style: none outside none;margin: 5px !important;padding: 0 !important;}
.PopularPosts ul li img {padding:0;-moz-border-radius: 5px;-webkit-border-radius: 5px;border-radius: 5px;-webkit-transition: all 0.3s ease;-moz-transition: all 0.3s ease;transition: all 0.3s ease;border: 2px solid #CCC;height: 80px;width: 80px;}
.PopularPosts ul li img:hover {border:2px solid #BBB;-moz-transform: scale(1.2) rotate(-1090deg) ;-webkit-transform: scale(1.2) rotate(-1090deg) ;-o-transform: scale(1.2) rotate(-1090deg) ;-ms-transform: scale(1.2) rotate(-1090deg) ;transform: scale(1.2) rotate(-1090deg) ;}
</style>

Note: Please You first Add Popular Posts widget to Your Blogger Sidebar. (Blogger widgets list..)

4 Now Click on Save Template,

5.Now Set Settings Your Popular Posts Widget , Like this,


6. Now Save Your Popular Posts Widget and You are Done..

Cheers.


Saturday, April 30, 2011

Add XML,HTML and JAVASCRIPT in Blogger Post as Plain Text

Add XML, HTML or JavaScript as a plain text in Blogger's post is like a headache for so many blogspot users, many bloggers still don't know why they are not able to post the html or java script codes in there blogger posts, so today i am going to tell you about a simple mozilla addon which can help you to solve this problem with ease.

1. First You Have Firefox Browser and Then Install Greasemonkey script on your Firefox browser with below link.


https://addons.mozilla.org/en-US/firefox/addon/748

Now Click on add to firefox and then install.

Add HTML as Plain Text in Blogger Post

Restart the Firefox after successful installation of add on, and you will find the Monkey icon in bottom right corner of your firefox window. (Note: View > Status Bar should be on)

2. Click on the below link and install the User script 'Blogger - HTML encode on post edit' to blogger.

http://userscripts.org/scripts/source/42696.user.js

Add XML as Plain Text in Blogger Post

This Script will add a new button at the bottom of your new post area. It encodes the selected text so that it can be posted as plain text in Blogger.It will look like the Below image.

HTML Encode Screen


When you want to encode some code select it and cick on 'HTML ENCODE SELECTION' button.
Add JAVASCRIPT as Plain Text in Blogger Post


Finally Your code will look like as given below after being encoded.Now you can publish your post and see the result.

Publish post wit plain html code

That's it ! Now Fire Queries if you have any :-) Enjoy !


Delicious Social Bookmarking Site Now Acquired by YouTube Founders

Yahoo! is excited to announce that Delicious has been acquired by the founders of YouTube, Chad Hurley and Steve Chen. As creators of the largest online video platform, Hurley and Chen have firsthand expertise enabling millions of consumers to share their experiences with the world. Delicious will become part of their new Internet company, AVOS.

Delicious Social Bookmarking Site Now Acquired by YouTube Founders

Following now is a news letter from Yahoo! to its end users(Delicious users). To continue using Delicious, you must agree to let Yahoo! transfer your bookmarks to AVOS. After a transition period and after your bookmarks are transferred, you will be subject to the AVOS terms of service and privacy policy.

Reasons to let Yahoo! transfer your bookmarks
  • Continue uninterrupted use of Delicious.
  • Keep your Delicious account and all your bookmarks.
  • Enjoy the same look and feel of Delicious today plus future product innovations.

What happens if you do not transfer your bookmarks
  • Delicious in its current form will be available until approximately July 2011.
  • After that, you will no longer be able to use your existing Delicious account and will not have
  • access to your existing bookmarks or account information.

About AVOS
AVOS is a new Internet company founded by Chad Hurley and Steve Chen who, in 2005, founded YouTube, the world's largest online video platform. Before YouTube, Hurley and Chen were early employees at PayPal, a leading online payment service that is now part of eBay. Delicious will become a part of AVOS, based in San Mateo, California.

Learn more about moving your bookmarks.

Yahoo! has appreciated having new owners for maintaining and using Delicious. Yahoo! people are pleased to be able to transfer Delicious to an incredible new owner -- in good hands

Hope we will see some new and incredible things in Delicious now onwards..


Saturday, April 16, 2011

How to add Skype Emoticons in Blogger?

Skype is a free service that enables us to make calls and send instant messaging over the internet .

Personally i uses skype a lot and loves to use smiles ,nothing would be better than if we could add skype emoticons to blogger. You may have seen tutorial to add yahoo emoticons to blogger ,this tutorial works on the same method.

Firstly we will include emoticons and symbols to our template so that our visitors know how to use this emoticons.
  1. Login to dashboard and Navigate to the Layout > Edit HTML tab.
  2. "Expand Widget Template".
  3. Locate this line of code.
    1
    <p> <data:blogCommentMessage/> </ p>
  4. Just below paste this code:
    1
    2
    3
    4
    5
    6
    7
    8
    9
    10
    11
    12
    13
    14
    15
    16
    17
    18
    19
    20
    21
    22
    23
    24
    25
    26
    27
    28
    29
    30
    31
    32
    33
    34
    35
    36
    37
    38
    39
    40
    41
    42
    43
    44
    45
    46
    47
    48
    49
    50
    51
    52
    53
    54
    55
    56
    57
    58
    59
    60
    61
    <div style=' width: 370px; TEXT-ALIGN: left; border: solid 2px #0084ce; background: #FEF9EA; padding: 10px; color:#0084ce; font-weight:bold;'>
     
     
    &#160;
     
    &#160;
     
    &#160;
     
    &#160;
     
    &#160;
     
    &#160;
     
    &#160;
     
    &#160;
     
    &#160;
     
    &#160;
     
    &#160;
     
    &#160;
     
    &#160;
     
    &#160;
     
    &#160;
     
    &#160;
     
    &#160;
     
    &#160;
     
    &#160;
    </div> </ Div>
  5. Save changes and we can see these emoticons above the comment form.emoticonsThis emoticons are not yet working ,to make them working we have to include script in the template code.
  6. Locate the in our template (the code near the end of it) and just above it, paste the script:
    1
    2
    3
    4
    5
    6
    7
    8
    9
    10
    11
    12
    13
    14
    15
    16
    17
    18
    19
    20
    21
    22
    23
    24
    25
    26
    27
    28
    29
    30
    31
    32
    33
    34
    35
    <script type='text/javascript'>
     
    //<![CDATA[ //<![ CDATA [
    a = document.getElementById('comments'); a = document.getElementById ('comments');
    if(a) { if (a) (
    b = a.getElementsByTagName("DD"); b = a.getElementsByTagName ("DD");
    for(i=0; i < b.length; i  ) { for (i = 0; i <b.length; i    ) (
    if (b.item(i).getAttribute('CLASS') == 'Author-comment-body' , 'comment-body') { if (b.item (i). getAttribute ('class') == 'Author-comment-body', 'comment-body') (
     
    b.item(i).innerHTML = _str; b.item (i). innerHTML = _str;
    } )
    } )
    } )
    //]]> //]]>
    </script> </ Script>


Final thought : Customization of box(around smiles).
We can easily change the background color , text alignment , padding by changing properties of the div element.
1
<div style=' width: 370px; TEXT-ALIGN: left; border: solid 2px #0084ce; backgro


Blogger Updates

Blogger Tips

Premium Templates

narrowsidebarads

Copyright © 2011. BLOGGING CASTLE- All Rights Reserved | Blog Posts by ANURAG | Edited by ASHISH. Powered by AndroidGyan.Com